This post may contain affiliate links.
We’re huge fans of grilled cheese in our house. Nothing beats the ooey-gooeyness of grilled cheese paired with tomato soup – the best soup with grilled cheese if you ask me.
One day while I was home with my son, I was trying to figure out what to make the two of us for lunch. My mind always goes to what do I need to use up before it goes bad?
We had a half a pack of King’s Hawaiian dinner rolls leftover from the weekend and we always have loads of cheese in the fridge so it clicked – and the best mini grilled cheese was born!
I’ve seen other sandwiches made with King’s Hawaiian Rolls, but not a mini grilled cheese grilled on a flat top or frying pan and that’s what makes grilled cheese so tasty.
I’m a huge fan of mini versions of foods and that’s what makes these the best mini grilled cheese you’ll ever have – and they’re perfect for kids too!
Table of Contents
Ingredients for Mini Grilled Cheese
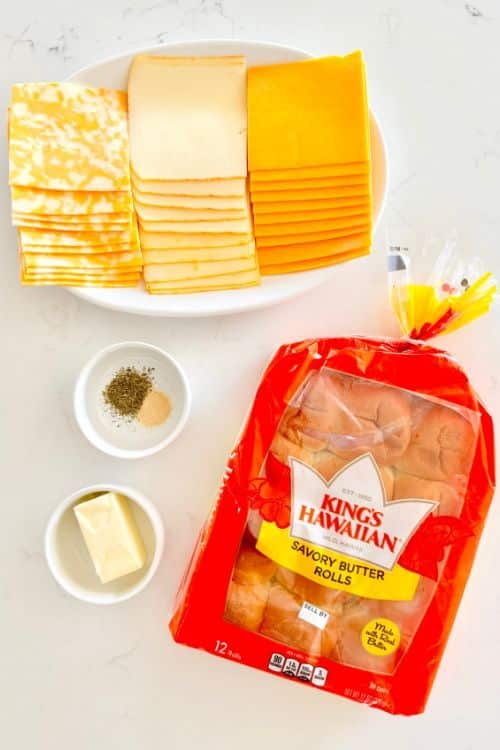
King’s Hawaiian Rolls
King’s Hawaiian Rolls are the perfect size for any kid-friendly sandwich or appetizer. You can typically find these in your bakery section or bread aisle.
If you can’t find the King’s Hawaiian brand, you can use any mini brioche dinner roll, slider buns, or even hamburger buns.
Sliced Cheese
The variety of cheese you use with these mini grilled cheese is up to you! We love using a few different cheeses because everyone in my family enjoys a different kind.
However, the best cheeses for grilled cheese is cheddar, gouda, and colby jack if you ask me.
For these kid-friendly mini grilled cheese, we used colby jack, muenster, and cheddar cheese to accommodate everyone’s cheese preferences.
Butter
Butter is literally what makes grilled cheese so tasty. I usually opt for unsalted butter to minimize added sodium, but use whatever you have around!
I also like to melt my butter before spreading it on my grilled cheese because it seeps into the bread so much better.
Garlic Powder and Italian Seasoning
Adding seasonings like garlic powder and Italian seasoning can add so much flavor to your mini grilled cheese. I like to add these to the melted butter prior to buttering the bread.
Opt for garlic powder over garlic salt. There’s still plenty of flavor, but without the added sodium.
Equipment for Mini Grilled Cheese
- Oil Brush
- Serrated Knife
- Cutting Board
- Rolling pin or drinking glass
- Frying Pan or Griddle
- Spatula
- Small bowl
How to Make Mini Grilled Cheese
Cut Rolls
Using your serrated knife, you’re going to slice your dinner rolls in half.
Because King’s Hawaiian Rolls typically come stuck together, you can cut them individually or in two sections (6 rolls each).
A serrated knife is key for cutting these dinner rolls or any bread because it helps to not squish your bread as you slice through it.
Flatten Rolls
After you’ve sliced your dinner rolls in half, you’ll flatten them. I didn’t have a rolling pin, so I used the side of a smooth drinking glass. You could also just flatten with your hands as well.
You don’t have to flatten the dinner rolls, but it does help give it more of a grilled cheese feel and helps the cheese melt better.
Butter Rolls
This is an important step! Before buttering your rolls, make sure to either cut the section of dinner rolls into two larger sections, or into individual pieces. I made the mistake of trying to fry up the whole section of the rolls, which made it really challenging to flip!
Melt your butter and add the garlic powder and Italian seasoning, giving it a good swirl with your oil brush.
Make sure to have the inside of the dinner roll facing out (the side you’ll actually fry) and butter that side.
I don’t know how many times I’ve made grilled cheese and buttered the wrong side, but that’s likely due to my ADHD.
Add Cheese and Cook
First, you’ll add one side of the buttered rolls to your griddle or frying pan. Remember, the inside if your roll is the outside of your mini grilled cheese.
No need to oil your pan prior to this step, as the butter on the roll functions as your grease.
Once your first half of your roll is frying, quickly add the cheese, then top it with the top of the roll, again “inside out” so the porous or inside of the roll side is facing up. Go ahead and butter.
For mini grilled cheese, I like to slice my cheese into four quarters or squares and stagger on the bread – usually one slice of cheese per roll.
I find that it’s best to cook grilled cheese on medium low to avoid burning the crust before the cheese has a chance to melt.
Flip Grilled Cheese
Once your bottom roll of your mini grilled cheese is gold brown, give it a flip, either individually or in your two sections of the pack of dinner rolls. Don’t do what I did and try to flip the whole block of rolls at once.
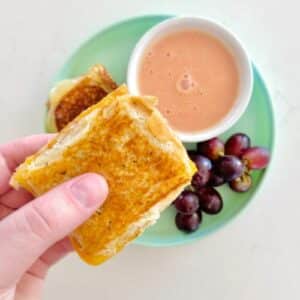
Cut Mini Grilled Cheese
When your cheese has melted and both sides of your mini grilled cheese are golden brown, remove the mini grilled cheese from the frying pan or griddle and set on a cutting board to cool and settle.
If you choose to fry your grilled cheese in two large sections, make sure to let the grilled cheese cool slightly prior to slicing into individual grilled cheese to avoid the cheese seeping out.
Again, a serrated knife works best for this step.
Variations
You can easily switch up the cheese and add in a few toppings to change these mini grilled cheese.
Try a pizza version with mozzarella cheese, pepperonis, and pizza sauce for dipping.
Add avocado for a bit of fruit in your mini grilled cheese and a boost of healthy fats.
Bacon is never a bad idea. Add some bacon and you almost have a BLT – minus the L.
To make them even more fun for your kids, try grilled cheese bites and cut your mini grilled cheese into four pieces for even smaller pieces to pick up and enjoy!
Sides for Mini Grilled Cheese
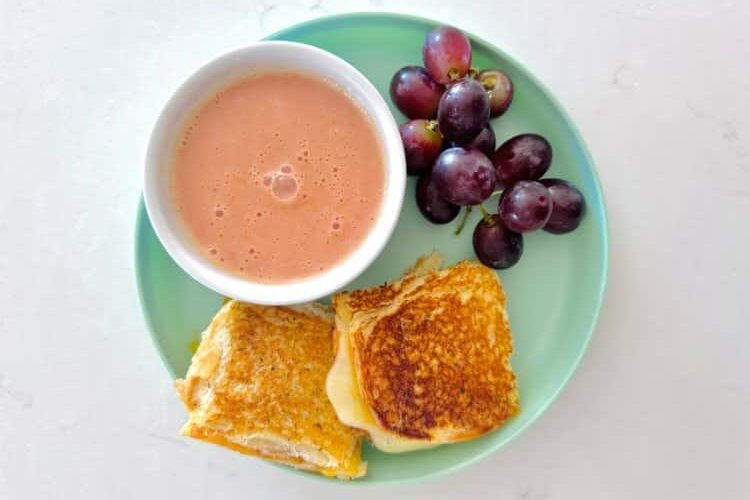
It’s a no-brainer that tomato soup is the best soup with grilled cheese, but it’s not the only option to enjoy with your mini grilled cheese.
- Tomato soup – try using soup as a dip for young kids or picky eaters
- Fresh fruit
- Fresh veggies
- Tater tots
- Sweet potato fries
- Broccoli tots
- Ketchup – growing up, if we didn’t have tomato soup, I loved dipping my grilled cheese in ketchup!
Can You Freeze Grilled Cheese
You can freeze grilled cheese, but like any premade food you freeze, it’s never as good as the fresh version.
Freeze these mini grilled cheese for up to six months before the bread starts to turn freezer burn.
How to Store and Reheat Grilled Cheese
You can store your mini grilled cheese in the fridge for three to five days or in the freezer for up to six months in an airtight container or Ziploc bag.
To reheat your grilled cheese from the fridge, simply microwave for thirty second increments until heated through.
For frozen grilled cheese, try to take out ahead of time to thaw, then microwave for thirty second increments or until heated through.
With either option, you can also fry in a pan until heated through as well.
Other Recipes You’ll Love
Strawberries and Cream Oatmeal
The Best English Muffin Pizza Recipe
The Best Mini Grilled Cheese
Equipment
- Serrated knife
- Cutting board
- Oil brush
- Small bowl microwavable
- Griddle or large frying pan
- Spatula
- Rolling Pin
Ingredients
- 1 pack King's Hawaiian Dinner Rolls (12 each) or slider buns
- 12 slices Cheese
- 4 Tbsp Butter
- 1 tsp Garlic Powder
- 2 tsp Italian seasoning
Instructions
- Slice rolls into 12 individual rolls or cut rolls into two sections with 6 rolls each. Using a serrated knife, slice the rolls in half.
- Flatten the top and bottoms of the rolls using a rolling pin, the side of a smooth drinking glass, or your hands.
- Turn griddle on medium-low heat. Melt butter in a microwave-safe dish for 30-second increments. Mix the garlic powder and Italian seasoning into the melted butter. Using your oil brush, brush melted butter onto the inside of one side of the rolls – this will be the outside of your grilled cheese.
- Cut cheese slices into four quarters. Place rolls on your griddle, butter side down, adding 4 small pieces of cheese to each dinner roll. Place the top of the roll on top of the cheese with the inside of the roll facing up. Brush the tops of the mini grilled cheese with butter.
- Flip the grilled cheese after a few minutes, or once the bottom is golden brown. Let the other side of the grilled cheese turn golden brown while the rest of the cheese melts. Remove the grilled cheese from the griddle. If you cooked your grilled cheese in two large sections (6 sandwiches in each), let the sandwiches cool before slicing into individual mini-grilled cheese.